Monday, October 25, 2010

Design Wall Monday-New Project

I held out as long as I could.I borrowed a Accuquilt Go cutter from a friend and bought a tumbler cutter. I got the idea for the quilt from Elizabeth Hartman. She has a really cute free pattern on her site, called the New Wave Quilt.

I bought a few 1/2 yard pieces to supplement colors I already had. I like the colors I chose, and I have enough cut to make one more top. I played around with using black for the sashing, but decided I liked the white better. I may do the next one iwth black sashing just for a change.

I only have two rows done so far, but I've taken a picture and played with it in Paint, so you can get an idea of what it will look like when it's done.

To see what others are doing, check out Judy's blog.

Thursday, October 14, 2010

Hand Made Gifts

A little departure from quilting for a moment. Judy L is asking, what we're making for folks for Christmas. I generally make baked goods, but the fun part is that I put them in Chinese take-out boxes that I've decorated. I bought a bunch of them, so I don't have to make them. They're available at some restaurant supply stores, but if you want to make your own, here is a small pattern, you can enlarge.

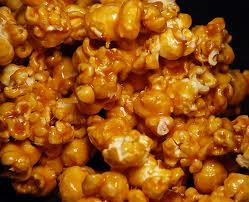
One of the favored items I put in them is caramel corn. It's yummy and a recipe from my father-in-law.

1 cup butter, 2 cups brown sugar, 1 tsp salt, 1/2 tsp baking soda, 1 tsp vanilla, 1 cup light karo syrup, 6 quarts popped corn (put into a 250 degree oven). I  use a foil turkey baking pan, because I don't have a large enough roaster to hold all the corn easily.

Melt the butter, stir in the sugar, karo syrup, and salt. Stir constantly and bring to a full boil. Turn to low, let it boil for 5 minutes with no stirring. Put it in a large pot, add the baking soda and vanilla--it will foam up. Pour over the popped corn, stir well. Bake it form 1 1/2 hours, stirring every 20 minutes to make sure all the corn is coated.

I've added nuts to the mixture after it's in the oven; you could also think of other yummy things to add, but the caramel is so wonderful, it really doesn't need much else.

When the 1 1/2 hours is up, spread it out on waxed paper on the counter top to cool, then bag and give away.

Tuesday, October 12, 2010

Which Banner

Everyone who has commented has liked the banner with the leading better, so thank you all for you input and that's what I'll be doing. Now I just have to get the last couple of elements done, and I'll be good. I need to add the cross and the "aurora" around it. I bought some silk I thought would work, but maybe not. I'll sew it together and see what I think once I look at it.

Monday, October 11, 2010

Design Wall Monday-Banner Progress

Slow progress, but I still like it. I decided that instead of moving from light to dark in the sky, I would keep it one color and just add clouds. I like the way it is looking. I need to decide if I'm going to add "leading" to make it look like stained glass. What do you think? The one on the right I just drew lines on in paint, but it gives the idea of leading. I have 1/4" bias tape to use if I want. The top bit is going to be one both along with an outline of some sort.

See what other people have on their design walls by checking Judy's blog.

Wednesday, September 29, 2010

Aspens changing


Joe and I decided to go look at the aspens this weekend. We've had a very warm September, so there was lots of color. I think I finally understand how the leaves change colors, and because we haven't had a hard frost yet, or at least not many frosty nights, the aspens still mostly have their leaves. We drove up to Cripple Creek which is at 10,000 feet (well OK, it's actually about 9,600) and the trees were just amazing. The ones in our backyard have all mostly lost their leaves already, but as you can see form the pictures, not so here.
We left to drive up at about 8:00. It was a beautiful day, and because we left so early we missed the traffic going up.

I don't know if you can see it very well, but in the first picture there is a lot of orange and red (for aspens). We don't  usually see that. Very cool.  
I thought these rocks were really cool looking. I was thinking they might be able to become a quilt or something. Joe decided he would go stand in front of them to shave some perspective of the size of the formation.

Pretty cool, huh?

Sunday, September 26, 2010

A bit more progress

This is how I am marking the fabric pieces. I traced all the pieces on paper, and cut them out. I pin and trace around each piece so I have the sewing line marked. Then I measure 1/4" away for the cutting line. I use a rotary cutter to cut each piece out. Oh, I also starched each piece of fabric so there is less stretching.

You can see the marks on the second picture. It really helps to have the seam lines marked, and the little tick marks to match one piece to another. It's a bit tedious, but gets the job done.

Here is what I have pieced so far.I Not too exciting yet, but I think it will look good when it's done. The green is just laying on the mountains at the moment. I'm too tired to sew it right now. More tomorrow after work.

If you want to see what other folks have on their design walls, check Judy's blog.

I love it when it works

I was trying to dye an ombre for the background of the banner. I knew I could mix different strengths of the dye and lay it out and squirt the dye on, but that process doesn't result in smooth transitions, and besides, I don't have a board wide enough to lay this piece of fabric out flat.

I decided to look around the internet and see what someone who's already done it had to say. I found a couple of sites, but they seemed too complicated. I finally looked at Dharma Trading company. It's where I buy all my dying supplies. Here is what I found. I have a clothes line I put up outside so I could dry my dyed fabrics more easily so I thought I'd try it. I didn't take any photos during the process because I forgot to bring my camera out with me, but here is the result. I was trying to give the idea of the red soil we have in Colorado, and I think I got a pretty good match if you look at the dirt in the picture you can see it's pretty close.

Here are the tools I used. I set this up under the clothes line and pinned the fabric to a plastic hanger. I tied a string to the hanger and looped it over the clothesline. I put the whole thing in the dye with 1 tablespoon of dye solution. I had pre-treated my silk with soda ash and dried it.  I put the whole piece in the dye and left it in for 5 minutes. I stirred it around to make sure it would be a pretty even dye. I also threw in another piece that I am going to use for the hanging sleeve. Every 5 minutes I added another tablespoon of the dye solution. I had pre-marked the fabric with safety pins so the gradations would be evenly spaced. I'm interested to see how it looks once I wash it. I didn't want the background to be too dark. In fact I pictured it just about this color, so YAY!

I have been using a book called the Fabric Dyer's Dictionary by Linda Johansen to get the approximate formulas for the dye solution. I am loving the book, because I don't have enough experience dyeing to know how to mix colors I want..


LinkWithin

Related Posts Plugin for WordPress, Blogger...